
We may earn revenue from the products available on this page and participate in affiliate programs. Learn More ›
The intrinsic value of a fine binocular lies in its ability to produce bright, sharp, aberration-free images. But you can only get the most out of your optic if you know how to adjust a binocular. This process is complicated by the fact that, besides making allowances for viewing distance, the binocular must also adjust for abnormalities that might exist in the viewer’s eyesight.
Interestingly, about 90 percent of the people who own binoculars don’t know how to focus them properly. This is particularly true of center-focus models. Without proper focusing, the best binoculars have no advantage over the worst. The following information will help you get the most from your binocular.

How to Adjust Binoculars, Step By Step
Step 1: Set Eyepiece Spacing
Begin by holding the binocular in a normal viewing position. Then, while grasping the barrels firmly with your hands, move them either closer together or farther apart until the images seen by your eyes form a single circular field of view. If the binocular has an interpupillary distance scale, note the setting for future reference. In any event, you’ll need to readjust when glassing nearby objects. With practice, you’ll be doing this automatically in a couple of seconds.
Step 2: Choose Eyecup Height
Adjustable eyecups, which are common on most modern binoculars, serve the dual purpose of excluding extraneous sidelight and positioning the eye pupils the correct distance from the eyepieces so as to see the instrument’s full field of view. Adjust the eyecups so that looking through the binocular is comfortable, and see our guide below for properly adjusting binocular eye cups.
Step 3: Focus the Lenses
There are three major types of focusing systems: 1) center focus with diopter adjustment; 2) individual focus, in which each eyepiece is focused separately; and 3) fixed focus, which is permanently prefocused for a specific viewing distance. Center-focusing binoculars are the most common type. Beside the center focusing wheel, there usually is a separate diopter adjustment that serves to compensate for unequal vision that might exist between the viewer’s two eyes. The diopter adjustment, which often has a scale showing plus (+) and minus (-) diopter settings on opposite sides of a zero (0) marker, might consist of a focusing ring located on the right eyepiece or it might exist as a cleverly disguised but separate function of the central-focusing system.
Diopters in these positions will adjust only the right optical system. However, on some models, the diopter setting is located on the left eyepiece, where it will adjust only the left optical system.
Step 4: Focus Non-Diopter Side
Using a lens cover or your hand, cover the objective (front) lens on the side of the binocular that has the diopter setting. Then, using the center-focus wheel, focus the side without the diopter setting on a distant object with fine detail, such as tree branches.
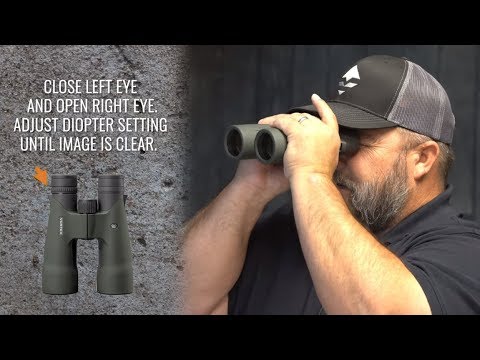
Step 5: Adjust Diopter Setting
While taking care not to change the setting of the center-focus wheel, uncover the objective lens on the diopter side, cover the opposite objective lens, and view the same tree with your other eye. Then, using the diopter setting, focus on the tree branches until the details sharpen again. At this point, it should appear sharp when viewed with both eyes. If not, you’ll need to repeat the process until you get it right. OOnce you’ve made the proper adjustments, you can focus on targets at any distance simply by turning the center-focus wheel. If there is a diopter scale, note the setting for future reference. With practice, this procedure will become second nature and you’ll be doing it from scratch in less than a minute. (Note: If you reverse the procedure and begin by using the diopter setting, you’ll never get the focus exactly right.)
Read Next: Best Binoculars, Tested and Reviewed
Adjusting Binocular Eyecups

Besides the central focus knob and the diopter (that little dial that focuses the right barrel), the only adjustable features on a binocular are the eyecups. But many hunters don’t seem to know how to adjust them so that they perform the job for which they are designed.
Many of my hunting buddies twist their binocular’s cups all the way out, so that they are fully extended, and they keep them there no matter the conditions. That’s great for blocking peripheral light just after sunup or just before sunset, but the fully extended cups are probably limiting their field of view and may also be promoting fogged lenses.
Here are the pros and cons of each of the three standard eyecup positions.
Fully Retracted
In this position, in which the eyecups are dialed right down to the ocular lens, the lens is exposed to the elements and may collect dust and grit. But because your eye can get closer to the lens, you can typically see a wider field of view. That’s important if you’re scanning an expansive area or are trying to observe an object on the periphery of the image. For those of us with deep-set eyes, this is the most comfortable position, as we can rest the retracted cups on our pronounced brows.
Eyeglass wearers will find this the most comfortable position, too. That’s because the eye relief required by most eyeglass users is about 12mm, approximately the distance from the eyeglass lens to the pupil. In that case, you want the front of your eyeglass lens to be as close as possible to the binocular’s ocular lens, and the only way to achieve that distance is with the eyecups dialed down.
Middle Extension
As you might guess, this middle position is the best for the widest variety of conditions. It allows for a decent field of view, it protects the ocular lens from dust, and it blocks a pretty fair amount of peripheral light. If you keep your eyecups at one position, this is probably the most useful. It typically puts the user’s pupil about 12mm to 15mm from the ocular lens, so the eye relief should be comfortable for a majority of users.
Fully Extended
This position, which puts the eye about 20mm from the optic’s lens, protects the ocular lens and blocks peripheral light, but it also limits the field of view. In binoculars with the most dramatic eyecup extension, the field of view can be limited by about 20 percent, effectively turning your 10X binocular into a 12X.
But there’s another hazard with full eyecup extension. It promotes lens fogging in cold conditions. During extended glassing sessions, the warmth from your face gets trapped in the space between your eye and the cold lens. The difference in temperature causes fogging. If this happens routinely, consider lowering the eyecups for what you expect will be long glassing sessions.

Final Thoughts on How to Adjust Binoculars
You’ll likely get dizzy trying to glass through a binocular that is not focused properly. At the very least, you won’t be using the glass to its full potential. So follow the aforementioned steps and take the time to adjust your binoculars properly. You might be surprised by how much more you’ll see.